
Rebel One, Janky Prov
Rebel Providence
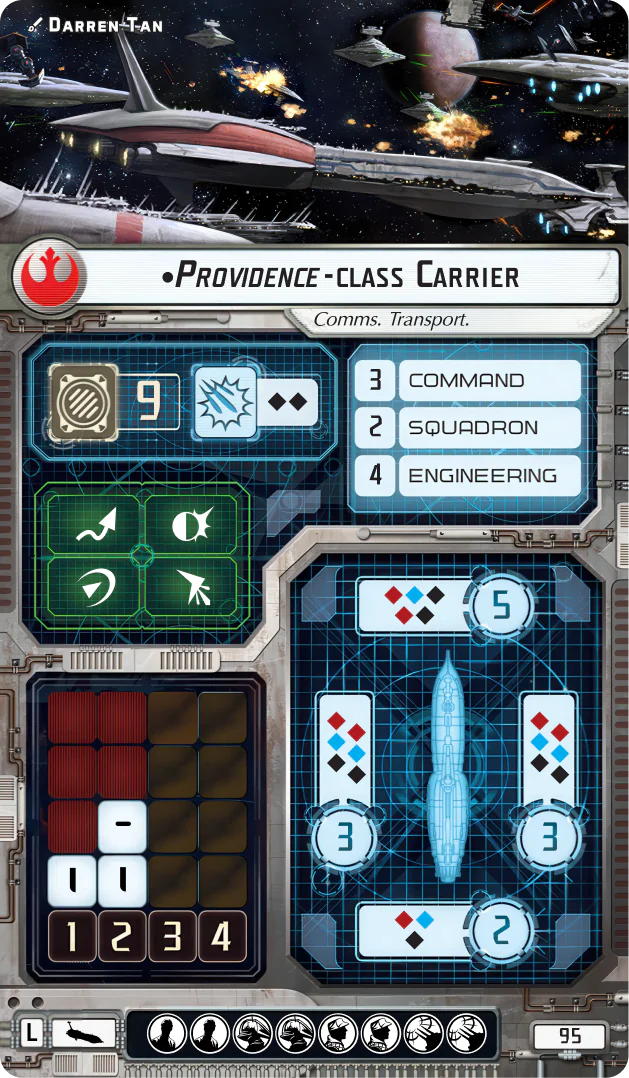
The Rebel Providence has the most unique upgrade bar of any ship in the game, but that’s not exactly to its benefit. Like many weird ships, it has a few niches but can struggle in play due to a few pronounced weaknesses. The navigation issue can be partially fixed with Engine Tech, but the defense and offense is a bit more thorny. Without a defensive retrofit (or much else in the way of defensive tech), the Prov is largely a sitting duck for opponents to engage or avoid at their leisure. It starts out relatively cheap for a large, but can get expensive quickly with upgrades, and you’d quite like to live long enough to make use of all those upgrades. Similarly, its best options for dice fixing are the weapons teams slots, and most options are pricey and limited in some way, not to mention the competition for the slot from other useful upgrades, like Flight Controllers or a boarding team. It also lacks the crucial External Racks slot, otherwise known as an Ordnance slot, meaning while having a lot of dice everywhere, it can lack that extra punch many similar larges have (see the MC75). Admirals can help with these issues a bit, but you’re mostly stuck with using Agate so you can keep the Prov around long enough to do its job. However, there’s a new card in town vying to make the Rebel Providence relevant, and it’s a doozy. Let’s take a look.
Rebel One
Rebel One
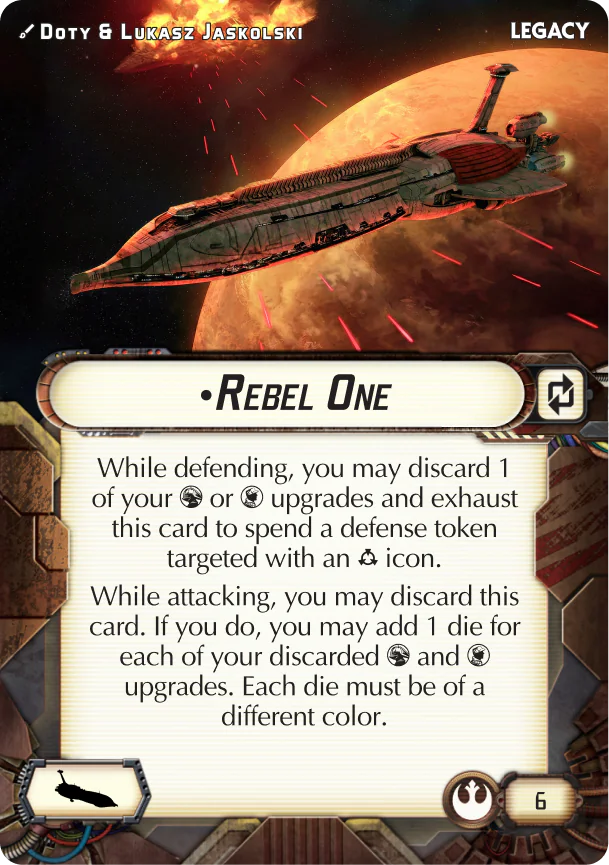
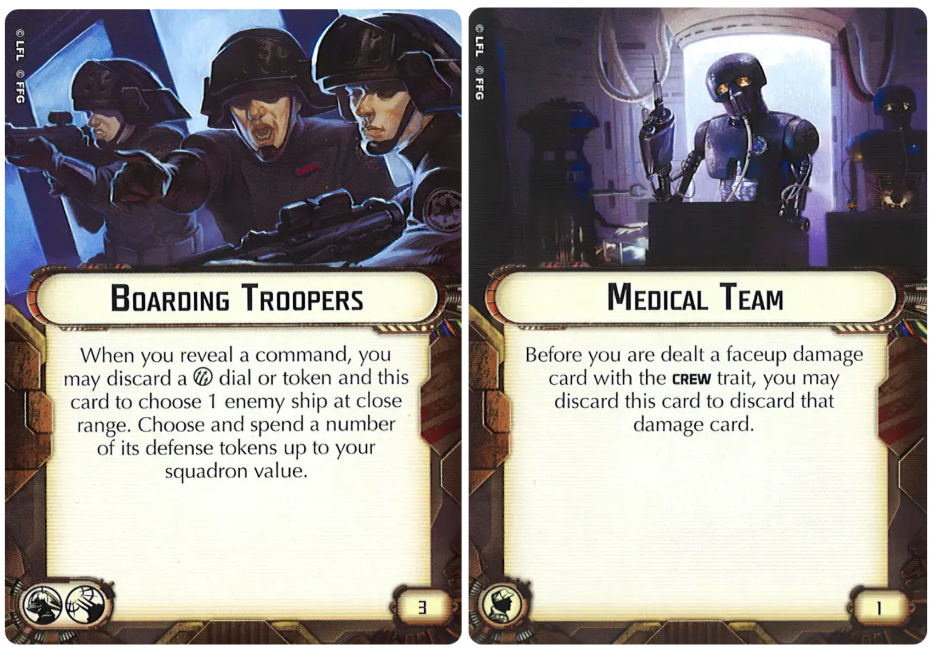
Let’s break down the two effects, starting with the defensive one. It allows you to spend a defense token that was locked by an accuracy, basically the same effect as Electronic Countermeasures, which has been the defensive card for most of Armada’s lifespan. Also like ECM, using this effect exhausts Rebel One, meaning it can only be used once per round. Unlike ECM, Rebel One does not have a refresh cost, but it does have an additional requirement to trigger: the ship must discard a weapons team or support team upgrade. That inherently gives the title a limited number of uses (up to a max of 4, assuming both weapons slots and support slots are filled and not discarded in some other way), as well as a pretty clear downside: losing your own upgrades that you paid for. The good news is that there’s a 1 pt card in the support team slot called Medical Teams, which is a pretty easy inclusion outside of some builds that need both slots (Engine Techs and Fighter Coordination Teams, for instance). Boarding Teams also count as a weapons upgrade, meaning they can be discarded in a pinch as well. Usually it’s worth discarding even a good upgrade to use a crucial brace or redirect and survive a big attack, and you can always choose the least useful upgrade at the time.
The offensive half of the card is a discard ability, meaning once per game. Doing so will also get rid of the defensive effect, so be sure you’re killing whatever you use this on. It works similarly to External Racks, in that you discard the card while attacking to add dice. Crucially though, you can use it at any range, and it adds up to one dice of each color, for a max of 3. However, it only adds those dice if you have discarded upgrades. It’s a good thing the first half of the card gives you a reliable way to do so, huh? Also, those boarding teams I mentioned earlier? They also count for this. I almost feel like one is mandatory, as otherwise you’re reliant on your opponent to use accuracies so you can lose upgrades then toss extra dice. That said, your opponent not using accuracies is its own reward, so build it how you like. Those dice have to be different colors, but there’s no restriction about range, so you should almost always choose a blue or black die first, then the other, and add a red die last. Finally, this offensive effect isn’t tied to being exhausted, meaning you can exhaust Rebel One for the ECM effect earlier in the round, then discard it later for the dice add (just not on a salvo, since you can never add dice to a salvo attack).
Team Upgrades
The easiest way to use this title, in my opinion, is with a boarding team and Medical Teams. Medical Teams and Rebel One give you a one-off ECM, and your other weapons + support team upgrade (usually some form of dice fixing and Engine Techs) can be discarded in a pinch. Then, you use the boarding team offensively, and get at least two bonus dice while attacking, maybe even 3. It takes a bit of investment in the ship (6pt title, plus several enabling upgrades), but it makes the Providence a very big threat. Guaranteeing a defense token once or twice makes the Rebel Providence much harder to kill, and lets it use that wonderfully diverse defense token suite to the fullest. Then, it can deliver a boarding team plus 11 dice on the double arc, PLUS whatever dice it can add from Rebel One. It’s a very mean activation. There’s still the struggle of navigating to deliver that payload, but with Engine Techs, the Rebel Prov actually turns a bit better than the Seppie one, which players largely seem to have adjusted to. While it definitely requires some advance planning, Rebel One is a very useful upgrade and something I think most Rebel Provs should equip.
Commander
Commander Sato (new)
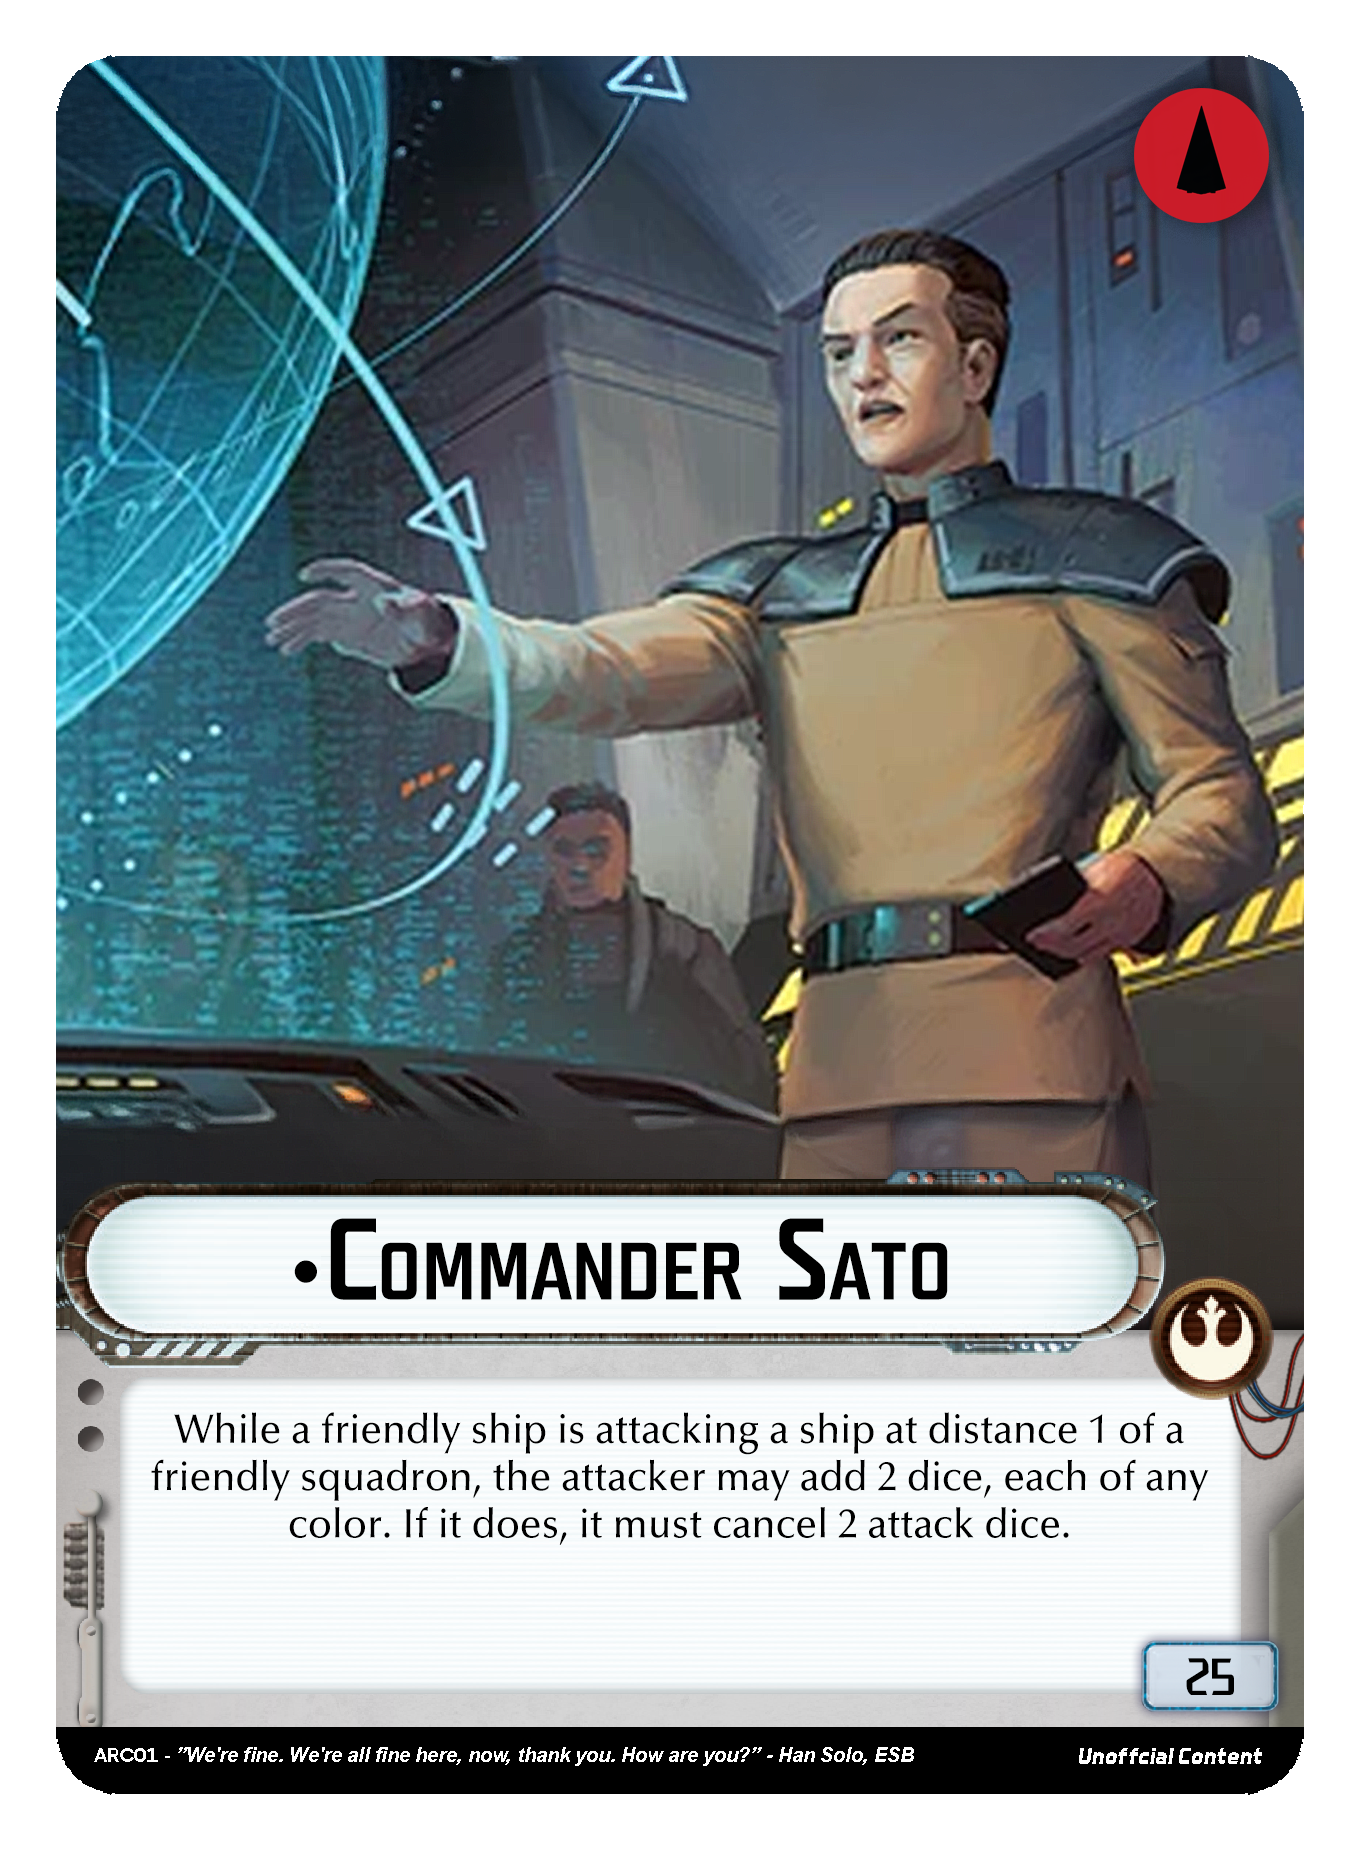
Commander Sato: He’s the best for my money. Arc Sato is very fun and surprisingly good, and the Prov both helps the squads get on target to activate Sato and benefits greatly from the dice fixing. Seriously, go make a Sato R1 fleet right now, it’s incredibly fun.
General Draven: Another ARC Admiral change (Arcmirange?), Draven and the Prov both help squads be good. Ten Numb used to be incredible, and can still be pretty strong in the right contexts, such as a Draven Prov fleet!
Mon Mothma: I still think Mothma is meh after the ARC buff, but many people think she’s amazing, and this is the only large she works with outside of an Amity Starhawk. I don’t think it’s great, but it’s certainly an interesting fleet, and means Mothma isn’t stuck running only smalls.
Officers
One of the few ships able to take multiple officers, the Prov has plenty of powerful options available to take advantage.
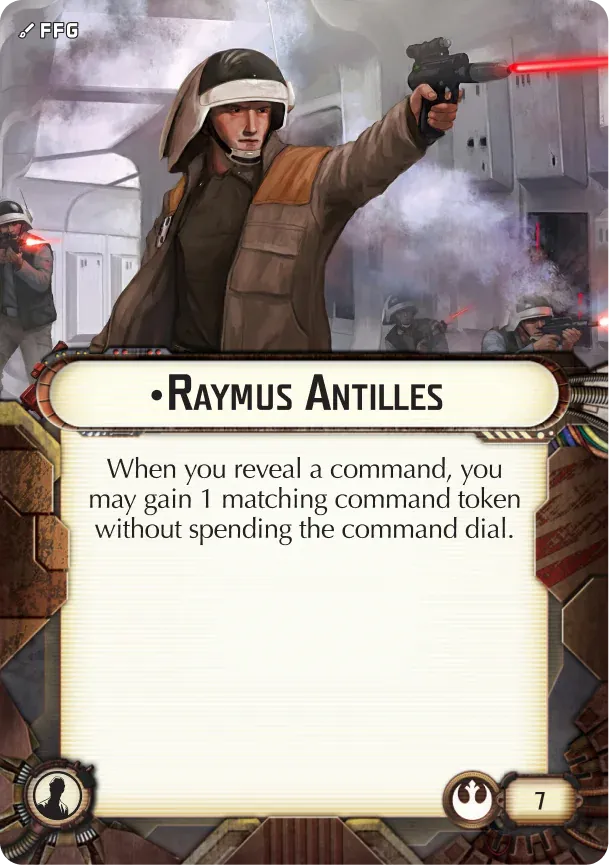
Raymus Antilles
Raymus Antilles: Raymus is one of the best options, which is a bit surprising because he’s not amazingly popular elsewhere. Tokens are great, but tokens AND still having an officer slot for whatever defensive/utility officer you want? Now that’s something special. Plus, the Prov is especially token hungry, even for a large, due to its preferred upgrades (squads, boarding teams, and Engine Techs).
Ahsoka Tano (but nearby): Put her on a nearby GR-75 instead of the Prov, but she’s so useful I put her here. She pairs amazingly with Raymus, and again, the Prov is a glutton for tokens.
Walex Blissex: Having no duplicate tokens can be bad sometimes (especially no extra redirect). Luckily, Walex is here to get whatever defense token you want back. He’s especially good for the Prov since all of the tokens are useful and liable to be discarded.
Lando Calrissian: Rerolling all your opponents dice is always useful, and here is no exception. Plus, you can evade afterwards to cancel/reroll anything you accidentally reroll into a double.
Toryn Farr: Great in general, but especially useful when moving a bunch of slow squads nearby and means your flotillas can hide away safely behind you.
Flight Commander: Also for a carrier Prov, you can use FC to activate the squads after giving them the Fighter Coordination Team boosts and take advantage of the increased threat range.
Kyrsta Agate: You have a salvo, so Agate Officer can get some solid work in. Having so many useful defense tokens also means you’re likely to have one wanting to be refreshed pretty often.
Major Derlin: Lando is usually better imo, but if he’s busy, Derlin is also a solid defensive option.
Boarding Teams:
You can take two of these, which is awesome! You should usually only take one though.
Boarding Troopers: a classic, and the best boarding team in most situations. Make the opponents Brace/s go bye bye and watch the damage pile up.
Shriv Surgaav: A bit more niche, but ripping off ECM/Thermals/PDIC is very very valuable in the right circumstances.
Cham Syndulla: A bit of a meme pick, you’d usually rather have an effect that helps you kill ships, like BT or Shriv. However, it is really funny to mega-slice a carrier away from squads for the rest of the game and then ignore it, or a combat ship to all squads.
Weapons Teams:
This is your dice fixing slot. Ideally you’d take two and have solid fixing, but the slot competes with boarding teams and Flight Controllers, so you’re usually just stuck with one. Choose wisely!
Caitken and Shollan: Only working on one attack and one color of dice is a real bummer, and looks like it’d be bad on the Prov due to the rainbows, and it kinda is. However, it’s the best you’ll get here in my opinion. Works well with Sato and Ackbar, and crucially fixes reds OR blacks, so can work at multiple ranges.
Veteran Gunners: A safe option to try and ensure average rolls. Usually VG can help fish for accuracies, but you’d want additional fixing afterwards so you don’t risk losing all your damage. I prefer C&S, but this is a fine choice as well.
Ordnance Experts: The worst of the dice fixing options in my opinion, but works very well with Sato, and is better than VG for close range attacks and flakking. Has the added benefit of being the cheapest option.
Flight Controllers: Only for carriers, but the Prov can be a pretty solid carrier. Make those slow squads soar!
Offensive Retrofit
You could probably justify any of the upgrades in this slot somehow or someway, but I’ll cover the major ones.
Expanded Hangar Bays and Boosted Comms: For the carrier prov in your life, a classic combo.
Expanded Hangar Bays on its own: boosting Boarding Troopers to three tokens is pretty solid, and lets you command more of a screen. Not amazing, but not a terrible use of the slot.
Flak Guns: You have a salvo, why not use it better?
Reserve Hangar Decks: Unfortunately only useful with Z-95s, but still a fantastic card, and Zs work great with Sato and Draven, two of the Prov’s favorite admirals.
Rapid Launch Bays: In my opinion, Engine Techs and FCT are just better. That said, RLB pairs well with Raddus, and it is fun to drop a bunch of bombers on someone while double-arcing them at close range.
Support Teams
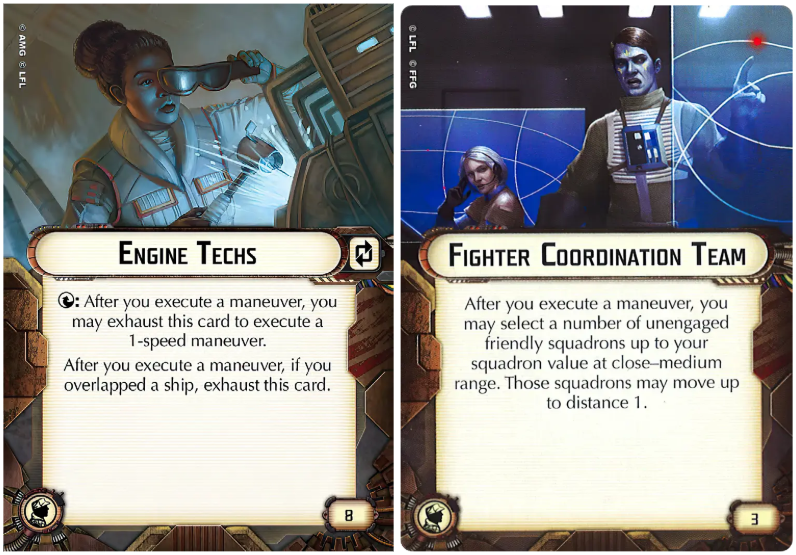
More Team Upgrades
Engine Techs: Pretty straightforward. You’re speed 2 and you need to go faster + turn better, ET to the rescue. This should always be equipped outside of some Raddus builds, unless you don’t care about making it to fight for some reason.
Fighter Coordination Teams: The Rebel Prov is the only ship in the game that can take both Engine Techs and FCTs to double bump squads. Pair with Flight Commander to take advantage of the extra movement, and watch those squads go soaring across the board.
Medical Team: If you don’t need/want to send your squads soaring, Medical Team is your emergency ECM button with Rebel 1, and should always be equipped into the empty slot imo.
Auxiliary Shields Team: A bit more expensive than Medical Teams, but serves the same purpose with a bit more benefit. Gain some additional shields early, then get rid of it for an emergency ECM. Pretty good for 3 points.
Builds
The Standard:
Providence-class Carrier {REB} (95) • Raymus Antilles (7) • Ordnance Experts (4) • Boarding Troopers (3) • Engine Techs (8) • Medical Team (1) • Rebel One [Legacy] (6) = 124 Points
I’ve explained most of the pieces of this when talking about R1 above, but I’ll summarize again here. For 124 points, this is a very mean ship. Assuming you use BT offensively, you have a guaranteed Brace/Redirect every round on the approach (easy discard from Med Team, + two more situational tosses), plus an evade and salvo for good measure. On the BT activation, you can toss R1 to double arc for 11 dice plus at least one extra, usually more. That and flipping the tokens usually cripples or outright kills most targets in the game. The biggest struggle with this build is a lack of dice fixing. I put Ordnance Experts on this version, but Veteran Gunners or Caitken and Shollan are both great options as well. Intensify Firepower elsewhere works great but is hard to come by, and Sato is fantastic with this build as well. You have an additional officer slot and both offensive retros to fill if needed, but really the only thing this build needs is an Ahsoka officer somewhere else to take advantage of Raymus. Him and Ahsoka combine to get you ET every round you need it, the BT token, and likely a bonus token here or there as well. I highly recommend giving this build a shot in rebels; it works under many different admirals and is just brutal when it goes off right.
Hive Queen:
Providence-class Carrier {REB} (95) • Raymus Antilles (7) • Flight Commander (3) • Veteran Gunners (5) • Flight Controllers (6) • Expanded Hangar Bay (5) • Boosted Comms (4) • Engine Techs (8) • Fighter Coordination Team (3) • Rebel One [Legacy] (6) = 142 Points
This is the classic Rebel Prov Niche build: ET and FCT to get those B-Wings (and or other slow squads) moving. I do actually think this build works a bit better with Agate, as if you’re spending this much on a carrier and then squads, you don’t have much else in the fleet for a commander to support. That said, I could still see this with a Sato fleet more focused on squads, and I’ve heard Draven is quite good. Raymus and an Ahsoka Officer elsewhere keeps the Engine Techs fueled while the Prov pushes the squads. Flight Commander lets you push the squads after they get their double FCT bump, greatly expanding their threat range, but could also be subbed out for Toryn Farr to take advantage of all the squads hanging out nearby (a 134 wants Toryn regardless, it’s just if you’d rather her on the flag or a flot). You’ll have to make some actual sacrifices when it comes to using R1 and keeping the Prov alive, but you can choose at the moment what upgrade is least useful, so it’s not too bad. Give it a shot so you can enjoy the fastest B-Wings known to man and Theelin.
The Raddus Drop:
Providence-class Carrier {REB} (95) • Veteran Captain (2) • Hondo Ohnaka (2) • Boarding Troopers (3) • Shriv Suurgav (4) • Rebel One [Legacy] (6) = 112 Points
This one's a bit of a meme, but it’s quite fun and would be a shame not to include. Due to its weird slots, the Rebel Prov is able to equip two boarding teams, and use them on the same target in the same activation. Flipping defense tokens and stripping ecm hermals/pdic makes for a very unhappy target. Plus, both boarding teams count for Rebel 1, giving you two extra dice immediately. This build is the very bare bones Raddus drop, and is very likely to die after dropping its boarding teams. Hondo and Vet Captain get you the tokens for each BT (although Hondo can sit elsewhere, or you could just use a squad dial). That said, if you do want it to survive after dropping the payload, Engine Techs to move away is a must, and a defensive officer or two wouldn’t hurt either. Either way, just make sure your drop cripples the opposing fleet and the rest of your ships and/or squads can clean up the fight from there.
Alright, that’s it for the first in my series of articles! I have more on the way covering the recent Legacy Wave 1 release, and I’ll probably write about some of the Arc changes as well cause their new Sato is super fun, and Draven is making big waves. Let me know if there’s other types of articles people would appreciate reading, and I’ll catch ya next time!